A coding dilemma.

This happens quite a lot in programming I find. There’s the ideal way of doing something and the way you actually end up doing it, be it due to buggy libraries, quirks of code, time or inexperience. I found one earlier today that had caught me out before. Modern cameras and images can have the orientation of the picture embedded. For example older cameras held normally may produce an image that is (widthxheight) 1024×768 and vertically an image of 768×1024. However a lot of the time now both images will internally be 1024×768 and have an orientation field (probably held in exif data I expect although in UIImage it’s a @!£%£@$^ read only property called imageOrientation) that informs you which way up the camera was when the shot was taken. Excellent. Not.

The problem with this occurs if you grab the raw image data to manipulate it and then convert it back. Say from a UIImage in cocoa/ukit whatever to an IplImage in opencv. What happens, if you had the camera held vertically, when you display your processed image is that it has rotated 90º ccw because you have not ported back the orientation data. That’s fine, copy the orientation data, then port it back. Except you can’t as apple in their infinite wisdom protect you from manipulating such things! I worked around this by avoiding having to manipulate my image that way within opencv. Many many others have worked around these problems by copying the orientation data and then using that to rotate their image before copying it back thus nullifying the need for orientation.

So to my specific problem. Opencv provides many many useful tools for discovering image data. It tends to present a lot of this data back to us as linked lists of points and the like. It also provides you with tools to draw said points in a meaningful way. One of which is cvDrawContours which takes a sequence of points and draws them using ‘pen’ information you provide (size, colour, etc.) onto your image. If this is done with a vertically taken iPhone camera image, copied to an IplImage, drawn on with cvDrawContours and then copied back to a UIImage to display your picture rotates 90º ccw. There are two potential solutions here:

  • Write aforementioned code that takes the old orientation into account and rotates the image post manipulation.
  • Rewrite the functions you need to to do any image drawing direct on your UIImage or Image object.

It might not be obvious but the former method is probably the worst of the two. It’s the quickest in terms of implementation. I think there are around 8 types of orientation of which 4 are mirrors so you only have to write code to rotate and/or mirror your image. However the other option is to simply doodle on your original using the data from opencv. Far more complicated for sure but it should be more efficient than rotating all those pixels about. I’ll find out when I’m done.

To do this I took the cvDrawImage code directly out of cxdrawing.cpp along with it’s helper functions and inline data structures in opencv and pasted it into my ImageView.m file. I renamed the function to uiDrawImage and altered the first parameter away from an IplImage to a UIImage. I then changed all function parameters away from a c++ style to an objective-c++ style. Of course it’s c++ so I had to rename the source file to ImageView.mm to get it compiled as objective-c++. No other changes needed except judicious deleting of functions that I shouldn’t have copied. The linker warnings gave them away so no problem there.

Now, a sequence of points in opencv is thankfully a doubly linked list with no tail and end. It’s effectively a circle of co-ordinates. This makes it easy to traverse and as it’s a list of structures that contain x&y floats or ints or whatever we should be able to rip out a lot of the code from cvDrawImage and get it so when it’s got the points it just adds them to a CGMutablePathRef. That’s effectively the same thing in cocoa/ukit whatever it is. After that there is a function provided that does the same thing as cvDrawImage but with a UIImage or Image. I’ve not looked that far yet.

If you hadn’t guessed this post is mostly laying out my current thinking on how to tackle this in the best way, not the way I’ll probably end up doing it. We’ll see.

Posted in Programming | Tagged , , , | Comments Off on A coding dilemma.

Cooking Lasagne

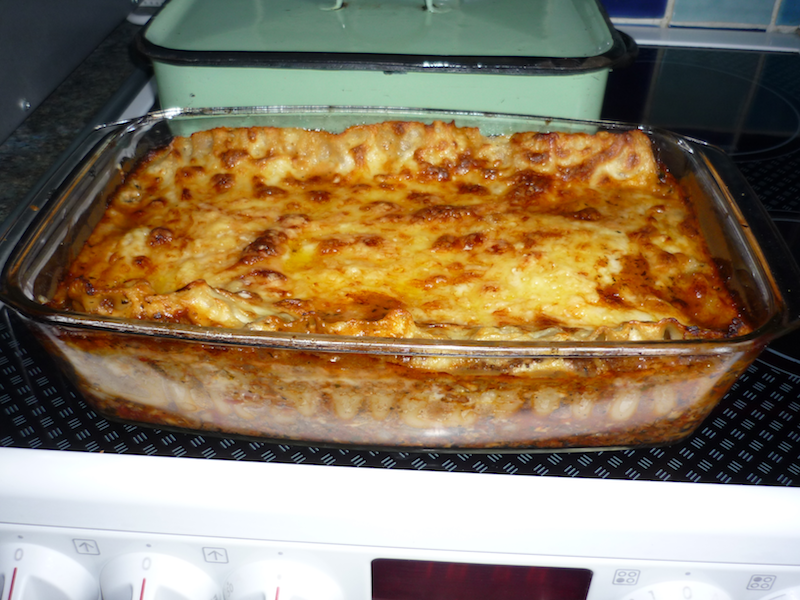
This is another dish made without any formal recipe, and what was to hand, so here goes. All quantities mentioned are what I ended up using. The dish was about 8×11 so almost the size of a sheet of A4 and 4″ deep.

Bolognaise
12 x Lasagne Sheets
12oz Minced Beef
12oz Mushed Tomatoes + Basil + Oregano (These were in a cardboard carton)
2 x Tablespoons Tomato Puree
1 x Diced Medium White Onion
8-10 Diced Chestnut Mushrooms
3-4 Cloves Crushed or Finely Diced Garlic
1 x Beef Stock Cube

White Sauce
2oz Plain White Flour
2oz Butter
1½pints Milk
Grated Parmesan/Chedder

Firstly turn on your oven to 180ºC. In a pan over medium heat melt the butter. Take the pan off the heat and stir in the flour a bit at a time. You should end up with a v. soft shiny dough, a roux. Slowly add the milk stirring constantly and return to the heat. Add the grated cheese. Take off the heat when the cheese has melted. Don’t worry too much about small lumps. You’ll be warming it up again later and it’ll form a skin and go a bit lumpy now anyhow.

In a large flat sided pan warm some olive oil. When it’s hot but not smoking add the garlic, onion and mince. Stir occasionally until the mince has browned off. Add the mushrooms, salt, pepper, dried basil, crushed stock cube, tomatoes, tomato puree and stir well. At this point I added ½ pint of water as well as it looked very dry. Wait until it simmers, stirring occasionally, and then turn down the heat a bit so it can be left to reduce.

When it has reduced sufficiently reheat the white sauce stirring constantly.

In your dish layer your bolognaise sauce (yes I’m using the french name, deal with it), white sauce and pasta sheets however you want. I didn’t have much in the way of white sauce, in fact the recipe above has the quantities adjusted from 1pt to 1½pt because of that, so I layered it, top to bottom:

More Grated Parmesan and a bit of Chedder
—-
White Sauce
—-
Pasta
—-
Bolognaise
—-
Pasta
—-
White Sauce
—-
Pasta
—-
Bolognese

Cook in the oven for 45 minutes. I turned the dish around after 30 minutes to brown it a bit more evenly. Serve it with a few green veg or salad. Especially good with a mixed green leaf salad and some garlic bread.

Lasagne

Lasagne

Posted in Cooking | Tagged , , | Comments Off on Cooking Lasagne

Progress Report

Integrated the rather excellent IASKAppSettings which solves my problem of trying to design a settings tab that looks like the auto generated ones that appear in the Settings diovan generic.app.  I keep the data from that in a singleton which is loaded every time the default tab is displayed.  It’s not ideal but there didn’t seem to be an appropriate message I could intercept for navigating away from the settings view or tab bar involved.  :/  I’m missing something there but this works for now as the settings only currently influence the opencv code for new puzzles.  If I have to hack it again I could do the same with each tab view it’s not exactly demanding code!

Aside from that it’s good process.  I’m making graphics for it when coding becomes a chore,  I’m doing UI stuff when my brain can’t cope with opencv! 🙂

Posted in Programming | Tagged , , | Comments Off on Progress Report

3 days learning and we have an iPhone App!

It didn’t take anywhere near as long as I thought.  I have two versions at the moment.  One which doesn’t work and crashes a lot but has pretty graphics/labels and one which implements OpenCV stuff but is still using place holders.  The crashes aren’t related, I started from scratch again today because  the OpenCV libraries needed testing.  So here’s a screen capture:

iPhoneSimulator

What’s happening here is that I can’t use the camera as the code is not signed and the iPhone Simulator is exactly that.  It’s not an emulator and thus cannot do all sorts of things, like say use a Mac’s built in camera.  So we select an existing photo (which I downloaded into the simulator using safari and browsing the local file system), what happens next is that the subsequent page does all of the processing whilst it loads the view.  This explains the minor delay.  What is also happening here so I can test things is that the initial image is displayed in the view but also added as the first frame of an animation.  Each subsequent processing step is added as another frame.  When the view is loaded the place holder button in the top right fires off a function that plays the animation over 5 seconds so I can get an overview of the image processing before progressing the application.  Simple?

It’s been frustrating but I really don’t think it’s bad to go from buying a Mac on Wednesday to having working iPhone code using external C++ based libraries in 3 days.  That includes learning Objective C, the iPhone API and a bit more of XCode although I have used it before.  Also gdb, which I ♥.  If I had to thank all the people who wrote tutorials and made video examples this would be a rather long article but I’ve thanked people on their blogs where they’ve given me major insight.

Posted in Programming | Tagged , , | Comments Off on 3 days learning and we have an iPhone App!

Walking over the Gravel Pits at Sunset

A few photos from a little stretch of Casey’s legs. Once the temperature had dropped enough not to kill the fluffy beast that is.

Posted in Miscellany | Comments Off on Walking over the Gravel Pits at Sunset

Setting up OpenCV for Xcode + iPhone

** This post will be updated as I progress **
*** This will be updated when I’ve actually got an application to the point where OpenCV is necessary. It currently links and builds fine but I haven’t tested it so I’m loathe to update these instructions until I have. ***

CMake

You need this to compile the newer versions of OpenCV.  Download it here:

http://www.cmake.org/cmake/resources/software.html

Extract and simply run ./configure.  In snow leopard this works and boot straps cmake.  I then simply ran:


Paul-Downss-MacBook-Pro:Programming diziet$ cd cmake-2.8.2/
Paul-Downss-MacBook-Pro:cmake-2.8.2 diziet$ ./configure
Paul-Downss-MacBook-Pro:cmake-2.8.2 diziet$ make && sudo make install

I did this as I don’t mind cmake installing into /usr/local/.

OpenCV

This is the doozy.  I believe that in order for this to work under the iPhone I need it built as a static library with as much as possible turned off  or built as a framework.  I have no idea how to do this and the online docs are out of date with the current cmake based build process.  Here goes…

I bet you’re glad you can’t see all the mistakes. I had to give up on getting the 2.1+ versions of opencv to compile. The CMake process, despite spitting out an XCode project, just would not happily cross compile and threw up countless QTKit/QuickTime framework and other errors involving carbon and all sorts.

So this is stealing some scripts etc. from:

http://niw.at/articles/2009/03/14/using-opencv-on-iphone/en

and adapting it to work with the latest iPhone dev and xcode. I hope using 2.0 opencv means I don’t have to change too much of my old code. In other words, you don’t need the CMake utility mentioned above any more.

Posted in Programming | Tagged , , , , | Comments Off on Setting up OpenCV for Xcode + iPhone

Quick Meringues!

Ingredients

2 x Spare Egg Whites
2oz. Caster Sugar
2oz. Icing Sugar

Pre-heat the oven to 100ºc.

A few pointers first of all. You must use a glass or metal bowl, it needs to be completely grease free. You should use a metal whisk and metal spoons. The spatula can be plastic as most people won’t have a metal one. The reasoning here is that with metal/glass the bubbles stay in better.

Also this recipe is very ad hoc. and was simply cooked because I had some egg white and wanted dessert.

Seeing as, more than likely, you have the egg whites left over from something else you’ve probably got them in a cup. Because of this I’d measure out the sugars into another two cups, once you get used to this you can stop measuring stuff and just have them in two separate cups to add then tip the rest back in the bag.

Pour the egg whites into your bowl and whisk until the whites are white and fluffy.  You should be able to raise peaks with the whisk that don’t flop over.  Add the caster sugar bit by bit (1 or 2 dessert spoons at a time if you have to measure it) whisking each successive lot in.  The mixture should look glossy now and still hold a peak.  You don’t want to over whisk it, this not a real danger if you do it by hand with a ballon whisk like I did.  Now you should add the icing sugar a bit at a time however this time you want to fold in the sugar.  Do this with the spatula, scooping it flat underneath half the mixture and tipping it over onto the rest.  Do this from the other side.  Then you can run the spatular down the middle like a knife and repeat the process.  The idea here is to combine the icing sugar without knocking air out of the mixture.  Just as a note don’t feel you need to add all the icing sugar, if you don’t want to because it won’t mix in or you think you might have knocked too much air out stop.  Do add at least 3/4’s if you can.

Now get your baking tray and line with grease proof paper.  Using one of your two metal spoons get a nice (up to you) dollop of the mixture and use the other spoon to scoop it onto the paper.  I got 5 fist sized meringues from my two egg whites.

Place in the oven for anywhere between 1hr 15mins to 1hr 45mins.  Turn after an hour if they’re going brown unevenly.

I cooked mine for 1hr 15m, they were quite large and finished the cooking time crunchy on the outside and really chewy inside.  I served lightly smashed on top with whipped double cream, another spare from the previous dish, and blueberries.

A quick note about meringues for the curious, you’re not so much cooking them as drying them out.  After I’d grabbed the ones I wanted for dessert I left the others in the oven with the oven turned off.  By tomorrow they should be crunchy all the way through.  It’s up to you how you like your meringue.  They’ll keep in an air tight box for a few weeks I expect.

Two Meringues

Two Meringues

Not too bad.  Of course you could make them flatter in which case they’ll get crunchy quicker or mould them with something so they make little cases etc. etc.

Posted in Cooking | Tagged , , | 1 Comment

Seafood Linguine

On Tuesday I found myself wanting dinner and after a weekend of a rather meat heavy diet fancied fish. This is roughly what I ended up cooking. I don’t have measurements for most of the ingredients. Also, as you’ll see in the post that follows this, what you don’t use…. makes dessert! The most important part of a meal. This served three but you can figure it out depending on how hungry your family is.

Ingredients:

6 Scallops
12 Large Tiger Prawns*
3 Squid*
Large Handful Cooked Mussels*
150ml Double Cream
2 Large Egg Yolks
2 Cloves Garlic
Flat Leaf (normal) Parsley
Oyster Mushrooms
Small Onion**
Spring Onion**
300g Linguine (Don’t buy cheap pasta)
Olive Oil
1/2 Lemon
Sea Salt
Black Pepper

* The measurements here aren’t available as I was plucking things from the fish counter having bought the scallops. The prawns I got came uncooked with tails on skewers. I got two skewers worth. The squid was well prepared ready to slice and about 5-6″ long. The mussels were bought as though you cupped both hands and filled them. Primary to bulk the rest of the dish out.
** I didn’t put onion in, I mention it here because you can. Cook the Small Onion finely chopped with the garlic. Finely chop 2 spring onions and add whilst reducing the cream.

Bring a large saucepan of water, with some salt to the boil. Check the cooking time of your pasta, mine was 11minutes.
Heat some olive oil in a decent sized pan, when hot but not smoking add the crushed garlic and scallops. Whilst the garlics browns slightly turn the scallops regularly. Turn the heart down to a medium temperature. Slice the squid into 1/4-1/2″ strips and add to the pan along with the tiger prawns and oyster mushrooms. When the scallops have cooked through add the double cream. Season well with salt and freshly ground black pepper.
Now is probably a good time to throw the pasta into your boiling water and set the timer on the oven appropriately.
Return your attention to the seafood and cream. You should be stirring this often. It should be bubbling gently and reducing, not boiling away. Add a good handful of finely chopped parsley and stir in, add the cooked mussels at this point. If you don’t have enough sauce for your taste by all means add a dash more cream.
When the cream has reduced to your satisfaction squeeze the half lemon juice into the pan and stir in swiftly. When the pasta is ready you should quickly stir in the 2 large egg yolks, keep the whites for dessert. You can either serve this on the pasta or drain and stir the pasta into the seafood. Decorate with some more finely chopped parsely. You could even offer some freshly grated parmesan.

The above recipe was adapted from one that used onions, only used cooked prawns and didn’t use mushrooms so feel free to use the seafood you want and leave out mushrooms if you don’t like them… etc. etc.

Next a hackish desert!

Posted in Cooking | Tagged , , | Comments Off on Seafood Linguine

New Mac!

Well it seems I can’t reliably fix my poor old MacBook Pro and I discovered that my credit card was significantly in credit! There’s a turn up for the books. Give or take £200 it was in credit to the tune of the basic 15″ MacBook Pro with Core i5 etc. etc. So finally I have a working mac. Today has been spent installing all the updates (1GB), XCode and the SDK’s (2+GB) and err… Steam with some games (10+GB).

So after a bit of reading and studying Objectiv C I have a few demo apps working on the iPhone simulator. Can’t deploy the code to an iPhone AFAIK as I haven’t paid apple my dues, y’know apart from a £1500 laptop. :/ Next steps are:

1) Design the UI
2) Work out how to interface with the camera
3) Work out how to integrate OpenCV.

In other news Sciatica is evil. It is in as few a words as possible “Absolute fucking agony”. At least now it just feels like cramp in my right ass cheek.

Posted in Miscellany | Tagged , , , | Comments Off on New Mac!

A musical blast from the past.

So before I get to laying a concrete path outside the dance floor needs polishing so it’s off out to the hire shop for some pads. This came on the radio:

Have to love 80’s. No it’s not a rick roll. It should be Bronski Beat.

Posted in Music | Tagged , , | Comments Off on A musical blast from the past.